Can I Just Sprinkle Clover Seeds on My Lawn
 James ThorntonLawn Equipment & Maintenance Expert | 20 Years
As an Amazon Associate we earn from qualifying purchases.
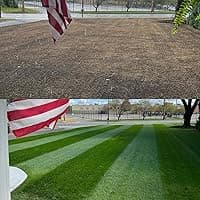
Homeowners often ask whether they can just sprinkle clover seeds on their lawn and expect a thick clover carpet to appear. The honest answer is that clover is more forgiving than grass seed, but the "just sprinkle" method only works in certain lawn conditions and usually gives thin, patchy coverage.
Clover seed behaves differently from grass seed: it is tiny, can germinate very close to the surface, and spreads later by stolons. That is why light sprinkling sometimes works, but without seed-to-soil contact and basic prep, a large percentage of the seed is lost to birds, drying out, or washing away.
This guide explains when sprinkling clover seeds on a lawn is enough, when it is almost guaranteed to fail, and how to do a low-effort overseed that actually establishes a durable clover-grass mix. It covers clover benefits, types, exact seeding methods, timing, soil and climate factors, and the most common mistakes to avoid.
You can just sprinkle clover seeds on your lawn and get some plants, but without exposing soil and keeping it moist for 2-3 weeks, expect spotty, uneven patches instead of a steady clover cover. For reliable results, mow low, bag clippings, lightly rake or aerate so you can see soil, then spread clover at the correct rate and water lightly once or twice daily until seedlings are 1-2 inches tall. Do not combine seeding with broadleaf herbicides or heavy nitrogen fertilizer, or you will kill or suppress the new clover.
- Surface-sprinkled clover only establishes well where at least 30-40% of the ground is visible soil instead of dense grass or thatch.
- Cool-season clover seeding works best when soil temperatures are roughly in the 50-65°F range for several weeks, avoiding midsummer heat or winter cold.
- Most mixed clover-grass lawns need only 1-2 ounces of clover seed per 1,000 square feet for noticeable coverage without a takeover.
- New clover seedbeds must stay consistently moist, usually with light watering once or twice daily for 14-21 days, to avoid seed death and patchy germination.
- Broadleaf weed killers and many pre-emergent herbicides can prevent clover germination, so you should leave a 4-8 week buffer between spraying and seeding.
Understanding Clover in a Lawn: Benefits, Types, and Expectations
Recommended products

Jonathan Green (10322) Black Beauty Ultra Grass Seed - Cool Season Lawn Seed (7 lb)
Premium cool-season grass seed blend that germinates quickly and fills in bare spots.

NightShift Kentucky Bluegrass Seed 25 lb
Premium Kentucky Bluegrass blend for thick, self-repairing cool-season lawns.
NightShift Perennial Ryegrass Seed 25 lb
Premium perennial ryegrass blend for overseeding and renovation.
Understanding clover in a lawn means knowing that it is a low-growing, nitrogen-fixing companion plant that changes how your yard looks, behaves, and needs to be maintained compared to a pure grass lawn. When that is clear, it is much easier to decide how aggressively to seed it and what results to expect.
Clover can significantly reduce fertilizer needs because it hosts bacteria that fix atmospheric nitrogen into forms plants can use. That makes it attractive for homeowners trying to cut back on synthetic fertilizer and still keep grass reasonably green. It is also more drought tolerant than many cool-season grasses, stays greener in moderate dry spells, and fills in bare spots faster through its spreading habit, helping choke out some weeds simply by occupying the space.
On the flip side, clover changes the look and feel of the lawn. The leaf texture is broader than most grasses, the color is often a deeper or different shade of green, and the mowing height sweet spot is a bit lower than a traditional high-cut fescue lawn. You also need to decide if you want a true clover lawn (mostly clover), a clover-grass mix (what most homeowners choose), or just scattered clover patches that soften the fertilizer bill and add some flowers for pollinators.
Why Add Clover to a Lawn in the First Place?
The main reason to add clover to a lawn is to create a lower-input, more resilient turf that relies less on synthetic nitrogen and tolerates imperfect watering and soil conditions better than grass alone. Clover functions as a built-in slow fertilizer system that shares nitrogen with neighboring grass over time.
Because clover fixes nitrogen, lawns with 20-40 percent clover coverage often need little to no additional nitrogen fertilizer once established. The plant also tends to stay greener through short droughts due to its deeper, more fibrous root system. It flowers, which boosts pollinator habitat and overall lawn biodiversity. Practically, clover spreads into thin or bare spots, so it can be part of a strategy to reduce eroding soil and open weed-prone patches.
However, the aesthetic shifts. A clover-grass lawn has a slightly bumpy look as the clover leaflets contrast with narrow blades of grass. The color can be darker or more mottled. For many homeowners, that is a plus and reads as lush; for those wanting uniform golf-course turf, clover will likely feel like a weed rather than a feature.
Types of Clover for Lawns and How They Behave
The main types of clover used in lawns are microclover and white Dutch clover, and they differ in size, spreading speed, and flower height, which affects how well the "just sprinkle" method will work. Choosing a variety suited to your goals and region is the first decision.
White Dutch clover is the traditional lawn clover. It spreads via stolons, forms patches that gradually knit together, and produces visible white flowers that can reach 3-6 inches if not mowed. Microclover is a form of white clover bred for smaller leaves, lower growth, and fewer flowers, so it blends more smoothly into grass and looks more like regular turf from a distance.
For simple sprinkling onto an existing lawn, white Dutch clover often establishes faster and more aggressively, since it sends out stolons readily and can fill small gaps. Microclover looks neater but sometimes needs more deliberate prep and seeding because its more compact habit means it does not jump gaps quite as quickly.
In cool-season regions (fescue, ryegrass, Kentucky bluegrass zones), both types can perform well. In warm-season regions (Bermuda, zoysia, St. Augustine), clover tends to thrive in cooler months and may thin in intense heat, though it can still serve as a winter and shoulder-season companion. Generally, clover handles USDA zones 3-9 in some form, but local performance depends heavily on summer heat and moisture.
How Clover Interacts With Existing Grass
Clover interacts with existing grass as a companion that occupies gaps and shares nitrogen, but it competes for light when mismanaged, which is why mowing height and fertilization control how much clover you ultimately see. Traditionally it was labeled a weed, but in a modern mixed lawn it is more of a partner plant.
Clover pairs well with cool-season grasses like tall fescue, Kentucky bluegrass, and perennial ryegrass, because they grow in similar temperature windows and mowing heights. It can also coexist with warm-season grasses like Bermuda and zoysia, though these are often mowed shorter and may dominate in hot months while clover resurges in cooler weather. St. Augustine lawns tend to shade the soil heavily, so clover struggles unless there are open gaps.
Mowing higher, in the 3-4 inch range, often favors grass dominance, while moderately low mowing around 2-3 inches allows clover to catch more light and expand. Heavy nitrogen fertilization pushes grasses to outcompete clover, while modest or no nitrogen lets clover gain ground. If a homeowner wants more clover, the strategy is slightly lower mowing and restrained nitrogen; if the goal is less clover, raise the cut and feed the grass more aggressively.
Can You Really Just Sprinkle Clover Seeds on Your Lawn?
You can really just sprinkle clover seeds on your lawn and get some germination, but consistent success depends on having exposed soil, decent moisture, and no recent herbicide use, so for most lawns, minimal prep beyond sprinkling is still strongly recommended. The key is understanding how little seed survives when it never touches soil.
In practice, the "just sprinkle" approach means walking the yard with a bag of seed and distributing it by hand over whatever is already there. There is no raking, dethatching, core aeration, or topdressing. On a thin lawn where you can easily see soil between grass plants, that can be enough because many seeds reach the ground. On a thick, plush lawn with a spongy thatch layer, most seed hangs up in the canopy where it dries out or is eaten.
This low-effort method works best when the turf is already thin, recently dethatched, or has been core aerated so there are visible openings down to the soil. Bare or lightly vegetated patches, especially in sunny areas, also respond well. It rarely works on compacted, heavily shaded, or bone-dry lawns, because roots cannot penetrate and moisture levels swing too wildly for seedlings to survive.
What “Just Sprinkling” Clover Seeds Actually Means
Just sprinkling clover seeds means applying seed to the surface of an unprepared lawn without any deliberate effort to create seed-to-soil contact or improve conditions for germination. In that scenario, seed fate is dictated by luck, birds, and the existing lawn structure.
On a thin or recently opened lawn, you might see 20-40 percent of seed take hold, leading to scattered clover plants that slowly spread over a year or two. On a dense, unmowed, or thatchy lawn, the effective germination can fall into the single digits, turning most of the seed into bird feed or dry husks. That is why homeowners often report "I sprinkled clover but nothing happened" when they did not mow low or expose soil first.
As a rule of thumb, if you stand over your lawn and cannot see at least 30 percent bare soil between blades, simply sprinkling seed on top is unlikely to give satisfying coverage without extra steps like mowing shorter, bagging clippings, and raking.
Germination Requirements: Why Contact With Soil Matters
Clovers germinate best when their tiny seeds have direct contact with moist soil at or near the surface, because that is how they absorb water steadily and anchor their first roots. Without that contact, any seed that dries once or twice before sprouting is usually dead.
Clover seeds are very small and do not need to be buried deeply, typically no more than 1/8 inch. However, they must sit against real soil, not suspended in long grass leaves or thatch. Seed-to-soil contact simply means that when you brush your hand across the surface, some seed is nestled into the soil pores, not just perched on vegetation.
Birds, wind, and foot traffic all work against surface-sprinkled seed. Birds quickly find exposed seed, especially when it is not lightly pressed in. Wind can cluster light clover seed, creating clumps instead of even coverage. Foot traffic before seeds are anchored can push them into piles or grind them into thatch.
In a well-prepped overseed, it is common to see strong coverage from a modest seeding rate. With pure sprinkling on a dense lawn, the effective germination rate can drop so low that even heavy seeding looks like a few random spots.
Pros and Cons of the “Just Sprinkle” Approach
The main advantage of just sprinkling clover seeds is that it is fast, simple, and nearly anyone can do it with no equipment, but the tradeoff is much higher seed waste and unpredictable coverage, especially on thick or compacted lawns. It is acceptable for a test patch but not ideal for a full-lawn conversion.
The pros are straightforward: no tools beyond a seed bag, minimal time investment, and low upfront cost if you are just experimenting on a corner of the yard. It is a good way to see if you like the look of clover-grass mix without committing to a full overseed project.
The cons matter more for whole-lawn jobs. Expect patchy, polka-dot clover distribution, and assume that a large portion of your seed budget goes to waste. On problem lawns with thatch or compaction, sprinkling can fail outright, leading homeowners to blame seed quality when the real issue was lack of soil contact and poor timing. Used as Phase 1, sprinkling can introduce some clover, then later you can overseed properly to densify coverage.
Step-by-Step: How to Overseed Clover Into an Existing Lawn (The Right Way)
Overseeding clover into an existing lawn the right way means combining a quick lawn assessment, light surface prep, correct seeding rate, even distribution, and consistent moisture for 2-3 weeks so that most of the seed you pay for turns into live plants. This does not require a full renovation, just a few deliberate steps.
The goal is to move from a random sprinkle to a controlled overseeding that still feels simple. After maintaining thousands of lawns, the pattern is clear: if you take 60-90 minutes to prep and seed correctly, you get several years of benefit, while skipping prep often means re-buying seed and repeating the process.
Step 1: Assess Your Lawn’s Current Condition
Assessing your lawn before seeding clover means checking thatch, compaction, sunlight, and weeds to decide whether simple overseeding will work or if you must correct bigger issues first. A 10-minute inspection saves months of disappointment.
Use this quick checklist:
- Thatch thickness: Pull back a small plug or slice. If there is more than about 1/2 inch of spongy brown material before you hit soil, seeds will hang up there rather than reaching the ground.
- Compaction: Push a screwdriver or thin stake into the soil. If you cannot get it 4-6 inches deep with moderate pressure, the soil is compacted and should be core aerated before or during overseeding.
- Sunlight: Note areas with less than 3-4 hours of direct sun; clover tolerates partial shade but not deep, all-day shade under dense trees.
- Weeds: Heavy weed pressure, especially from broadleaf weeds, may require control well ahead of clover seeding because the same products that kill dandelions usually damage clover.
If thatch is excessive or compaction is severe, address those with dethatching or core aeration first, then plan your clover overseed. This is also a good time to consider a soil test, especially if the lawn has struggled; guides on How to Test Your Soil at Home and Lawn Aeration Guide walk through those steps.
Step 2: Choose the Right Clover Seed and Rate
Choosing the right clover seed and rate means picking a species suited to lawn use and applying enough to be visible without overwhelming the existing grass. The target is a comfortable clover percentage, not a total takeover unless that is your goal.
For most mixed lawns, microclover or white Dutch clover are the best choices. Microclover suits homeowners wanting a subtler look with fewer flowers and smaller leaves. Standard white Dutch clover suits those who welcome more visible blooms and faster spread, especially on thinner turf.
Typical seeding rates are:
- Clover-grass mix lawn: About 1-2 ounces of clover seed per 1,000 square feet.
- Mostly clover lawn: Roughly 4-6 ounces per 1,000 square feet, often combined with a light grass overseed.
- Spot patches: A pinch per square foot, sprinkled directly on prepared soil.
If you are truly just sprinkling on an existing lawn with minimal prep, you may increase the rate by 25-50 percent to offset lost seed. Always read the seed tag for purity and presence of inoculant (beneficial bacteria). High-quality clover seed should have a clear purity percentage and often a coating that includes inoculant to boost nitrogen fixation.
Step 3: Improve Seed-to-Soil Contact Without Re-Sodding
Improving seed-to-soil contact for clover overseeding means briefly lowering mowing height, opening the canopy, and optionally core aerating so seedlings have actual soil to root into, all without removing your existing lawn. This is the main upgrade over the "just sprinkle" method.
Here is a simple preparation routine that most homeowners can complete in an afternoon:
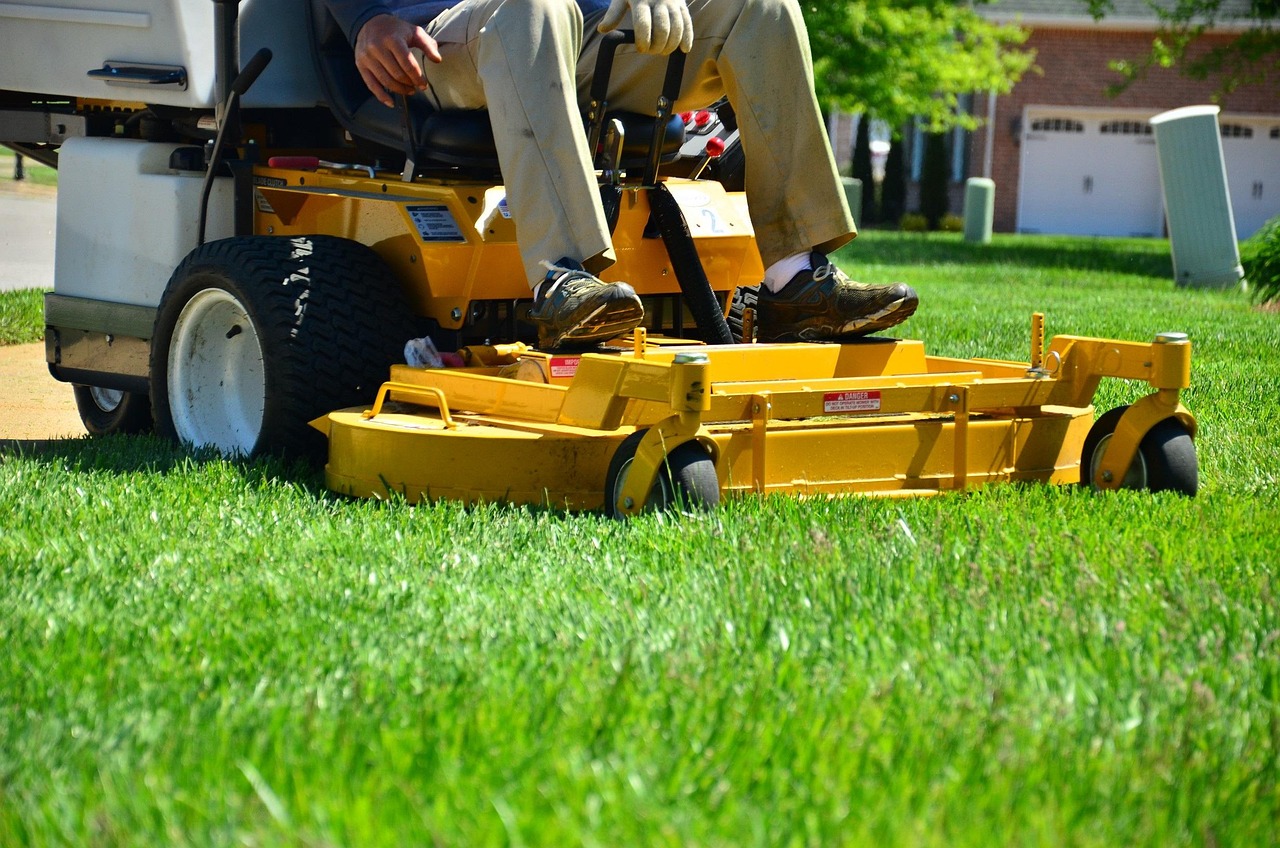
- Mow short: Set the mower one notch lower than usual, even two if the lawn is tall, and bag the clippings. You are not trying to scalp to dirt everywhere, but you do want to reduce canopy height so seed can fall through.
- Rake or lightly dethatch: Use a leaf rake to rough up the surface and pull out loose thatch. If you already own a dethatching rake or machine, a light pass opens the turf nicely.
- Optional core aeration: Running a core aerator before seeding creates thousands of small holes where seed and water collect. This is especially important on compacted soils.
- Light topdressing (optional): If the soil surface is uneven or poor, spread a very thin 1/8-1/4 inch layer of compost or screened soil in the thinnest areas. Thicker layers can bury grass and should be avoided.
Once prep is done, the lawn should look slightly rough, with flecks of soil clearly visible between grass blades. That is the sign that sprinkling clover now will give much higher germination than before.
Step 4: How to Sprinkle Clover Seeds Evenly
Sprinkling clover seeds evenly means using a deliberate pattern and often a spreader or carrier material so those tiny seeds do not end up in clumps and bare strips. Uniform distribution is what prevents the lawn from looking like it has polka dots.
Hand spreading works on very small areas, but for most lawns, a handheld or small broadcast spreader is more consistent. A helpful technique is the "half-rate in two directions" method: set the spreader to apply half your intended rate, walk north-south over the entire area, then refill and walk east-west. This naturally evens out light and heavy zones.
Because clover seed is so fine, mixing it with dry sand or a granular starter fertilizer can make spreading easier and more uniform. For example, mix 1 part clover seed with 5-10 parts sand by volume, then calibrate your spreader to empty the mixture over the target square footage. Avoid spreading in high wind, and be mindful of slopes where seed could wash downhill; on those, go lighter and consider a very light raking to lock seed in place.
Step 5: Watering and Aftercare for Clover Establishment
Watering and aftercare for clover overseeding means keeping the seedbed consistently moist but not waterlogged for 2-3 weeks, then transitioning to normal lawn watering and mowing once seedlings are established. The first 21 days do most of the work.
In most climates, the best approach is light, frequent irrigation until germination, then gradually fewer, deeper waterings. Aim for:
- Days 1-14: Light watering once or twice per day so the top 1/2 inch of soil never fully dries out.
- Days 15-21: Reduce to once per day or every other day, depending on weather, while ensuring seedlings do not wilt.
- After 3 weeks: Shift toward a typical schedule that gives the lawn about 1 inch of total water per week from rain and irrigation combined.
- Clemson Home & Garden Information Center guidance emphasizes that new seedbeds should remain evenly moist for roughly 2-3 weeks after seeding so germinating seeds do not dry out between waterings.
Hold off on mowing until clover seedlings reach at least 2 inches tall and can bend under the mower wheels rather than being ripped out. Set the mower high on the first cut. Avoid applying high-nitrogen fertilizer in the first couple of months; clover does not need it, and excess nitrogen will push grass to outcompete your new plants. For more detail on irrigation patterns, the topic How Often Should You Water a New Lawn covers deeper scheduling.
Timing, Climate, and Soil: Advanced Factors That Make or Break Clover Seeding
Timing, climate, and soil make or break clover seeding because they control seed germination temperature, root development, and overall survival, regardless of how carefully you sprinkle the seed. Getting these right usually matters more than the exact clover variety.
Clover likes cool to mild conditions, reasonably neutral soil pH, and at least partial sun. Seeding in the wrong season, into highly acidic or compacted soil, or under full shade are the main non-obvious reasons clover fails even when the sprinkling and watering look correct.
Best Time of Year to Sprinkle Clover Seeds on a Lawn
The best time of year to sprinkle clover seeds on a lawn is when soil temperatures are cool to moderate, roughly in the same window that cool-season grasses germinate well, avoiding extreme heat and deep cold. For many regions this means early to mid spring or late summer into early fall.
Cool-season regions usually have two good windows:
- Spring: Once soil has warmed but before early summer heat, often mid April through May.
- Late summer/fall: After peak heat breaks, often late August through September, allowing roots to develop before winter.
Warm-season regions often have a single main window in late winter or early spring so clover can establish before intense summer heat, or in fall when temperatures drop again. The underlying principle is soil temperature.
- Michigan State University Turf notes that cool-season grass seeds germinate best when soil temperatures hold roughly between 50 and 65°F, and clover overseeding tends to perform well in that same temperature range.
Here is a simple timing comparison by region:
| Region type | Primary clover seeding window | Secondary window |
|---|---|---|
| Cool-season (upper Midwest, Northeast) | Mid April - late May | Late August - late September |
| Transitional (Mid-Atlantic, lower Midwest) | Late March - early May | Early September - early October |
| Warm-season (Deep South, Gulf Coast) | Late February - early April | Late October - November in milder areas |
Trying to just sprinkle clover seeds on a lawn in midsummer heat or frozen winter soil usually fails because seeds either cook on the surface or sit dormant until they rot. If you are unsure, align clover seeding with the Best Time to Plant Grass Seed by Region in your area and avoid the year's temperature extremes.
Soil Conditions and pH for Clover Success
Soil conditions and pH for clover success revolve around loose, moderately fertile soil with a near-neutral pH, since extremes in acidity or alkalinity and severe compaction both limit root growth and nitrogen fixation. Clover is more tolerant than some grasses but not invincible.
Most clovers prefer soil pH somewhere near 6.0-7.0. If a soil test shows a significantly lower pH, lime may be recommended before or alongside seeding. High pH soils are harder to adjust but may require sulfur or other amendments. Beyond pH, phosphorus and potassium levels matter for root and stolon development; after a soil test, follow recommendations for these nutrients but hold off on heavy nitrogen, which clover can supply over time.
Compaction, as identified earlier with the screwdriver test, should be relieved by core aeration before overseeding. That single step often has more impact than adding products. Since clover is meant to help reduce future fertilizer needs, a basic soil test is particularly valuable before relying on it as the main nitrogen source; otherwise, poor pH or nutrient imbalances may be misdiagnosed as seed or watering problems.
Sun, Shade, and Microclimates
Sun, shade, and microclimates affect clover seeding because clover needs at least partial sun and decent drainage, so heavily shaded or soggy spots will stay bare no matter how much seed you sprinkle. Light quantity is a more common limiter than many homeowners realize.
Clover generally performs well in full sun to light shade, roughly 3-6 hours of direct sun or bright dappled light. Under dense tree canopies or on the north side of tall structures where direct sun may be under 2 hours, clover stands often thin or fail after initial germination. South-facing slopes dry faster and can stress seedlings without close attention to watering, while low spots may stay too wet and risk root disease.
If a lawn has noticeably different microclimates, adjust expectations. In deep shade, think about shade-tolerant groundcovers or mulch beds instead of trying to force clover. On hot, exposed slopes, seed earlier in the season and watch moisture carefully. Simply adding more clover seed is not a solution when the fundamental limit is light.
Clover and Lawn Chemicals: Herbicides, Pre-Emergents, and Fertilizers
Clover and lawn chemicals interact in ways that often prevent germination or kill seedlings, so timing clover seeding around herbicide and fertilizer use is critical. Most broadleaf weed controls are not compatible with clover establishment.
Typical broadleaf herbicides used for dandelion and plantain are non-selective against clover and will damage both existing and new plants. Pre-emergent crabgrass products often prevent many small-seeded broadleaf species, including clover, from sprouting. As a rule, avoid seeding clover for at least 4-8 weeks after applying these products, and avoid applying them for several weeks after seeding until clover is well established.
Fertilizer strategy should also change. Traditional high-nitrogen programs designed for pure turfgrass are not ideal for clover-grass mixes. Once clover is established, reduce nitrogen application rates and focus more on balanced or low-nitrogen feeds guided by soil tests. For those planning pre-emergent schedules, When to Apply Pre-Emergent to Your Lawn is a useful planning reference, but remember to leave clear windows for any clover seeding.
Managing a Clover-Grass Lawn Over Time
Managing a clover-grass lawn over time means adjusting mowing height, watering, and fertilization to maintain a balanced mix, plus addressing traffic, pets, and blooming so the lawn functions well for your household. Once clover is in, the maintenance pattern shifts slightly from a pure grass lawn.
The goal is to stabilize clover coverage where it helps reduce fertilizer and weeds without letting it dominate if you still value the look and feel of turfgrass. That balance is controlled more by mowing and feeding than by repeated re-seeding.
Mowing Practices for a Healthy Clover Mix
Mowing practices for a healthy clover mix focus on moderate heights and consistent cuts that allow both grass and clover to photosynthesize and recover. Too low or too infrequent mowing can push the mix out of balance.
For most mixed lawns, an ideal mowing height is 2.5-3.5 inches. This range keeps clover in the canopy without letting it tower or bloom excessively, while still supporting healthy grass. Mowing too low, below about 2 inches, can scalp clover patches and stress shallow-rooted grass, particularly in heat. Mowing less often at a higher height allows more clover flowers, which is positive for pollinators but may concern families with young children or bee allergies.
If controlling blooms is a priority, mow frequently during peak flowering, perhaps every 5-7 days in the growing season. That keeps flowers small and less attractive to bees while retaining the lawn benefits of the clover itself.
Balancing Clover Coverage: Too Little vs Too Much
Balancing clover coverage means steering the lawn toward a comfortable clover percentage, often around 10-40 percent, and adjusting seeding, mowing, and fertilization when the plant is either too sparse or dominant. Coverage is not fixed; it responds to management.
If clover coverage is too low or patchy after sprinkling, overseed again at a moderate rate (1-2 ounces per 1,000 square feet) using the improved prep steps rather than just repeating the same sprinkle. Slightly lower mowing and reduced nitrogen for a year will also allow existing clover to spread.
If clover has taken over more than desired, consider these adjustments:
- Increase nitrogen fertilizer modestly, based on soil test guidance, to boost grass competitiveness.
- Raise mowing height slightly so taller grass shades clover stolons.
- Overseed with grass types compatible with your climate, such as perennial ryegrass in cool-season areas or Bermuda overseeding strategies in warm-season regions.
Spot-treating clover with herbicides is possible but usually counterproductive if your goal is a mixed lawn. It is better to manage the balance through cultural practices than to chase individual patches with chemicals.
Pets, Children, and Use Patterns
Pets, children, and use patterns influence how well a clover-grass lawn holds up, since clover tolerates traffic and pet urine differently from pure grass. For most families, clover improves durability but may require some bee-awareness.
Clover handles moderate foot traffic well, often better than thin turfgrass, because it spreads and self-repairs via stolons. Dog urine spots that burn grass often show less damage in clover patches, since clover is more tolerant of nitrogen and salt load. However, heavy traffic in concentrated paths can still thin clover and grass alike, so consider stepping stones or designated paths in those areas.
The main safety consideration is bees. Flowering clover attracts them, which is beneficial ecologically but can be a concern where barefoot children play or someone has a severe allergy. To reduce bee activity in play zones, mow frequently to remove blooms during peak play seasons or keep clover density lower in those specific areas.
Integration With Other Lawn Improvements
Integrating clover overseeding with other lawn improvements means pairing it with practices like core aeration, dethatching, and grass overseeding to gain multiple benefits from a single project. This is often the most efficient way to achieve a high-quality lawn with less long-term input.
Core aeration followed by a combined clover and grass overseed is a powerful combination. The aeration opens compacted soil, improves water and air flow, and creates ideal pockets for both seeds. Dethatching before seeding removes the barrier that often defeats the "just sprinkle" approach.
Many homeowners choose to overseed grass and clover together in the same pass, especially when following guides like Overseeding an Existing Lawn Step-by-Step or How to Dethatch Your Lawn Safely. In that case, apply grass seed at the recommended overseeding rate for your species, and layer clover seed on top at the low end of its range (around 1 ounce per 1,000 square feet) to avoid overcrowding.
Common Mistakes to Avoid
Common mistakes to avoid when adding clover to a lawn include overestimating what "just sprinkling" can do, ignoring timing and chemical conflicts, and overlooking site-specific factors like soil pH and shade. Avoiding these is usually enough to turn a frustrating project into a successful one.
Most failed clover seedings trace back to one or two of these errors rather than bad seed or an unsuitable variety, so treating this as a diagnostic checklist is useful if a previous attempt has not worked out.
Assuming You Can Always “Just Sprinkle” Clover Seeds on Any Lawn
Assuming you can always just sprinkle clover seeds on any lawn is a mistake because dense thatch, compacted soil, heavy shade, and long grass block seed from reaching soil and staying moist. In those conditions, germination is so low that it appears nothing happened.
Common versions of this error include tossing clover onto an unmowed, shaggy lawn, spreading over a thick mat of last fall's leaves, or trying to seed into a heavily thatched, spongy turf without raking. In each case, seed never contacts soil, and what little germinates cannot root deeply enough to survive. The fix is to mow shorter, bag debris, and open the surface before sprinkling.
Getting the Timing and Products Wrong
Getting the timing and products wrong means seeding clover in temperature extremes or during herbicide activity windows that prevent germination. This can wipe out even well-prepped seedbeds.
Examples include seeding during peak summer heat when daytime soil temperatures at the surface regularly exceed comfortable ranges, or in midwinter when soil is frozen. Another frequent issue is applying a broadleaf weed killer or pre-emergent crabgrass product and then seeding clover a week later, only to find nothing comes up.
To avoid this, align clover seeding with the mild soil temperature windows typical for cool-season seed, and maintain a 4-8 week buffer between broadleaf or pre-emergent applications and any clover overseeding. After seeding, avoid those same products until the clover is well established.
Overlooking Regional, Soil, and Safety Factors
Overlooking regional, soil, and safety factors leads to clover failure in climates or sites where it would never thrive, even with perfect technique, and can create unwanted risks where bees and barefoot play intersect. Matching expectations to the site is critical.
Using the wrong clover type for your climate, such as expecting cool-loving clover to thrive in an intensely hot, irrigated-free lawn in a desert-like climate, is one example. Ignoring soil pH and nutrient imbalances is another; if the soil is very acidic or deficient, clover will struggle regardless of seeding method. Safety-wise, not planning for increased bee activity in high-traffic play areas can be an issue for families managing allergies.
Another common oversight is failing to inspect germination after 14-21 days. If you check early and see thin or patchy germination, a quick follow-up overseed can correct it. If you never look closely, weeks turn into months and the window for easy correction is missed.
What Other Guides Miss
What other guides miss about sprinkling clover seeds on a lawn is how small changes in prep and timing drastically improve results, plus the long-term management needed to keep clover at the right level instead of swinging between too little and too much. Many resources stop at "clover is easy" without explaining the real thresholds.
First, they often gloss over thatch and compaction. If a screwdriver will not sink 4-6 inches, or if there is more than 1/2 inch of thatch, sprinkling is mostly a waste until aeration or dethatching is done. Second, they rarely emphasize verifying germination at the 2-3 week mark and re-seeding while the soil is still in the right temperature window. Finally, few explain how fertilizer programs must change: continuing a high-nitrogen turf schedule after adding clover undermines the very reason you planted it, which is to let it carry more of the nitrogen load.
Conclusion
You can sometimes just sprinkle clover seeds on your lawn and get a usable result, but consistent success depends on soil contact, mild temperatures, and avoiding chemical conflicts, not on how much seed you throw. A little extra prep - mowing short, opening the surface, and watering correctly for 2-3 weeks - multiplies your chances of turning those seeds into a lasting clover-grass mix.
The key takeaways are straightforward: choose the right seeding window for your region, expose at least some soil before spreading seed, keep the surface evenly moist until seedlings are established, and then manage mowing height and fertilizer to maintain the clover balance you want. As next steps, consider a basic soil test, plan your seeding around your local Best Time to Overseed Your Lawn, and review a Lawn Aeration Guide if compaction is an issue. With that plan, clover can cut fertilizer use, fill bare spots, and make your lawn more resilient with far less trial and error.
Free Lawn Care Tools
Frequently Asked Questions
Common questions about this topic
You can sprinkle clover seeds on an existing lawn and get some plants, but results are usually patchy unless you expose soil first. For better success, mow low, bag clippings, lightly rake to open the surface, then sprinkle seed and keep the area evenly moist for 2-3 weeks.
For a mixed clover-grass lawn, use about 1-2 ounces of clover seed per 1,000 square feet. For a mostly clover lawn, you may need 4-6 ounces per 1,000 square feet, often combined with a light grass overseed to help fill gaps.
The best time to seed clover is during mild weather when soil is cool to moderate, similar to cool-season grass seeding windows. That usually means mid spring or late summer into early fall in cool-season regions, and late winter to early spring or fall in warm-season regions, avoiding peak heat or frozen ground.
Clover typically germinates within 7-14 days under good moisture and temperature conditions, and you should see clear seedlings by 2-3 weeks. It may take one full growing season for clover to spread and fill gaps through stolons, especially if you started with a low seeding rate.
Clover usually does not kill grass outright, but it can dominate thin, underfed turf over time. If you maintain reasonable mowing height and apply moderate nitrogen fertilizer based on soil tests, the grass will stay competitive and you can hold clover to a comfortable 10-40 percent of the lawn.
Most broadleaf weed killers and many pre-emergent products will damage or prevent clover, so they should not be used immediately after seeding. Wait until clover is well established and consider spot-treating only the worst weeds, or switch to cultural methods like mowing, overseeding grass, and adjusting fertilization to manage weeds instead.
Clover fixes its own nitrogen, so it usually does not need additional nitrogen fertilizer once established, and too much nitrogen can actually favor grass over clover. However, clover and grass still need adequate phosphorus and potassium plus the right pH, so follow soil test recommendations for those nutrients even in a clover-rich lawn.
Loading product recommendations...
Identify your grass in seconds, on your phone
Download the free What Grass Is This? iPhone app for instant grass ID, soil-timed reminders, and a plan tuned to your lawn.
 On your computer? Scan with your iPhone camera.
Related Articles
- Seeding/Overseeding & Establishment
Pennington Smart Seed Planting Guide: Step-by-step Instructions
Mar 29, 2026•7 min read - Seeding/Overseeding & Establishment
Is It Too Late to Seed Your Lawn? Spring and Fall Deadlines by Region
Mar 27, 2026•7 min read - Seeding/Overseeding & Establishment
Growing Grass from Seed How Long: Complete Care Guide
Dec 18, 2025•12 min read